Planned Costs
- JeanH (Deactivated)
- FrancoisL (Deactivated)
The Planned Costs page allows you to enter all expenses and all team positions you expect the Folio will require during its lifespan. Expenses are added to one of three main categories: Operational expenditures (OPEX), Capital expenditures (CAPEX) or Financial expenditures (FINEX). Expenses can be single occurrence or recurrent ones. Positions are the team members you will need to accomplish the work, such as developers, testers, team leads, etc. and are added to the operational expenditures. Information entered here will be used to provide project health metrics on the Overview page and shown as a reference on the Costs Forecast chart. Planned costs can be baselined for future reference and comparing various scenarios.
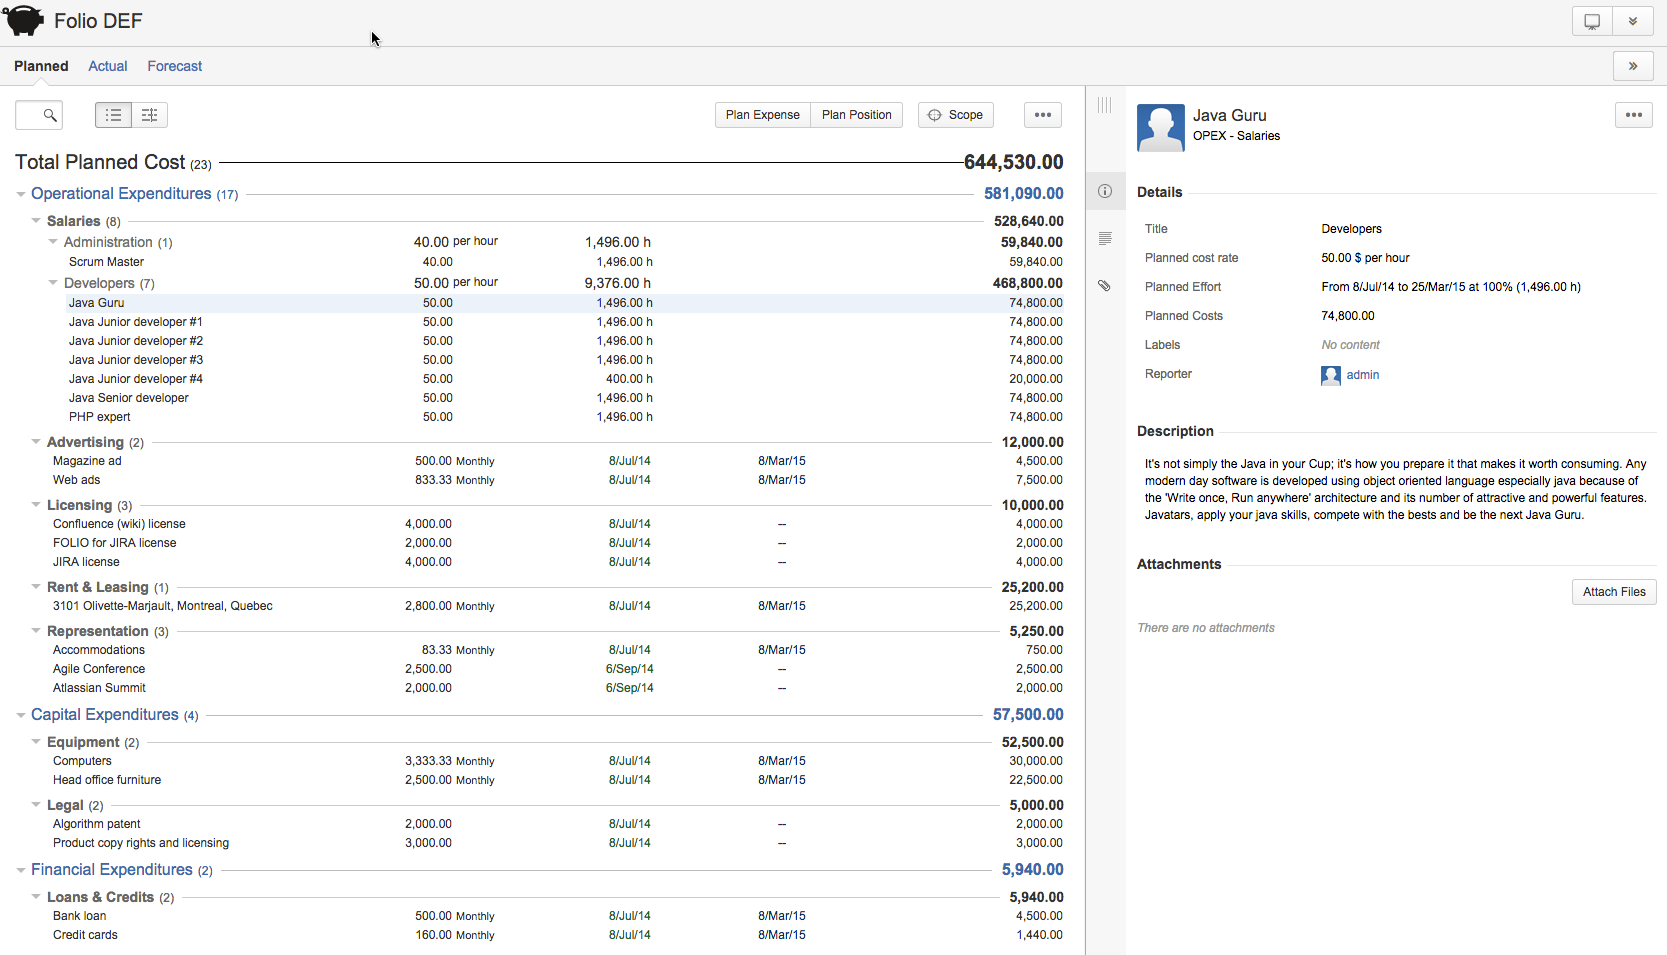
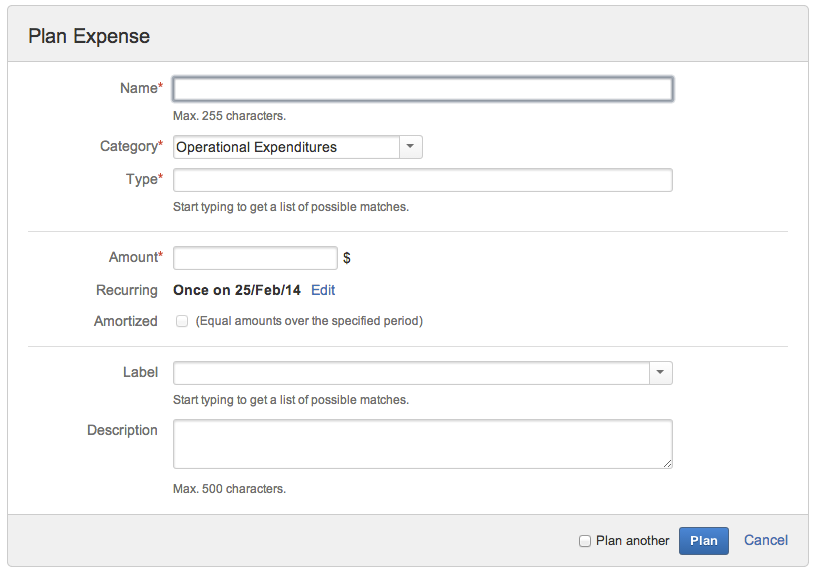
ExpensesExpenses are the all the expenses you plan the Folio will incur at one point or another. The Planned Costs page shows the calculated cost for each expense and expense groups (by type). You can collapse (or expand) a group of expenses by clicking the triangle icon ( See the Expenses page for more information on expenses and how their cost is calculated. Planning an expenseTo add an expense, either click the Plan Expense button or hit the "a" (for add) shortcut key. This brings the expense edition dialog. Refer to the Editing an Expense section to learn how to fill the edition dialog. Check the Plan another box at the bottom of the dialog in order to create many expenses in sequence.
Select an existing expense to modify by clicking on it and then either click on the drop-down menu on the top-right part of the expense details view (on righthand side of the screen) and select the Edit option or hit the "e" (for edit) shortcut key. This will bring up the expense edition dialog.
Deleting an expenseSelect an existing expense to delete by clicking on it and then either click on the ... menu on the top-right part of the details panel (on righthand side of the screen) and select the Delete option or hit the d (for delete) shortcut key. This brings up a dialog to confirm expense deletion. Click the Delete button to confirm the deletion, or Cancel link to abort. Deletion is permanent, thus make sure you really want to delete an expense before proceeding. You can delete multiple expenses (even a mix of expenses and positions) at once. Refer to the Multiple Selection to learn how to perform a batch deletion. Attaching files to an expenseYou can attach files to an expense in order to keep related documents handy (invoices, quotations, etc.). To attach files to an expense, select it and then click button Attach Files in expense details panel on the right. This will bring up a dialog where you can pick a file (or multiple files simultaneously, if your browser allows it) and enter an optional comment. Viewing Expense detailsWhen selecting an expense, more information on that expense is displayed in the details panel on the right. Note that you can also select multiple expenses (or even a mix of expenses and positions) at once by selecting multiple lines. This provides you an aggregated view showing the total cost associated with these expenditures. Searching for expensesYou can search for expenses by their name using the search box located at the top left of the screen.
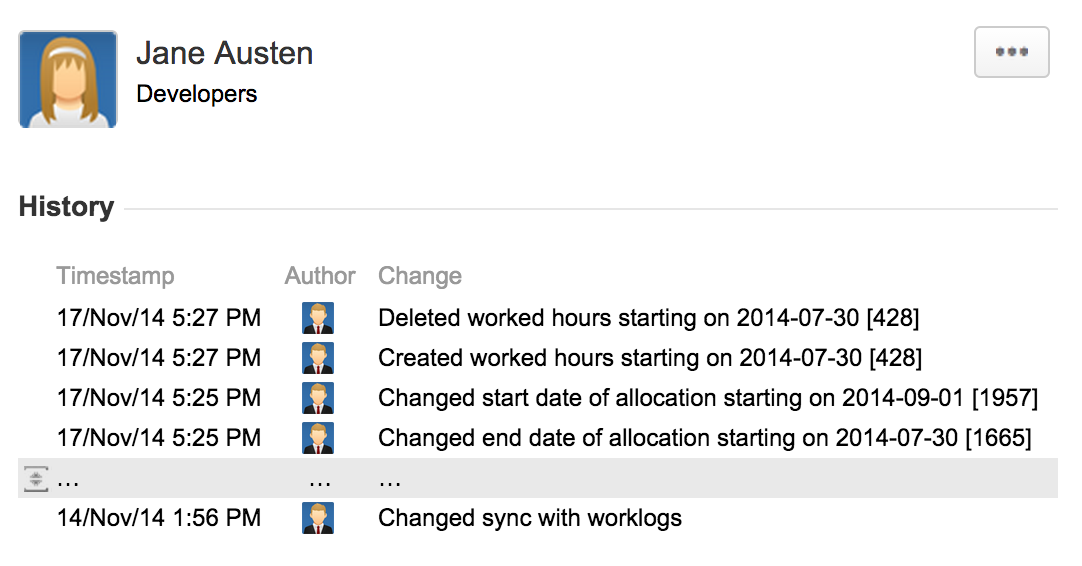
Tempo Folio records all changes that occur on Folios and their data for auditing purpose. When an expense, revenue or team member is selected, the details panel shows a History sub section, quickly accessible by clicking the corresponding icon ( The History section is visible only to users who can edit the Folio, a.k.a Folio administrators.
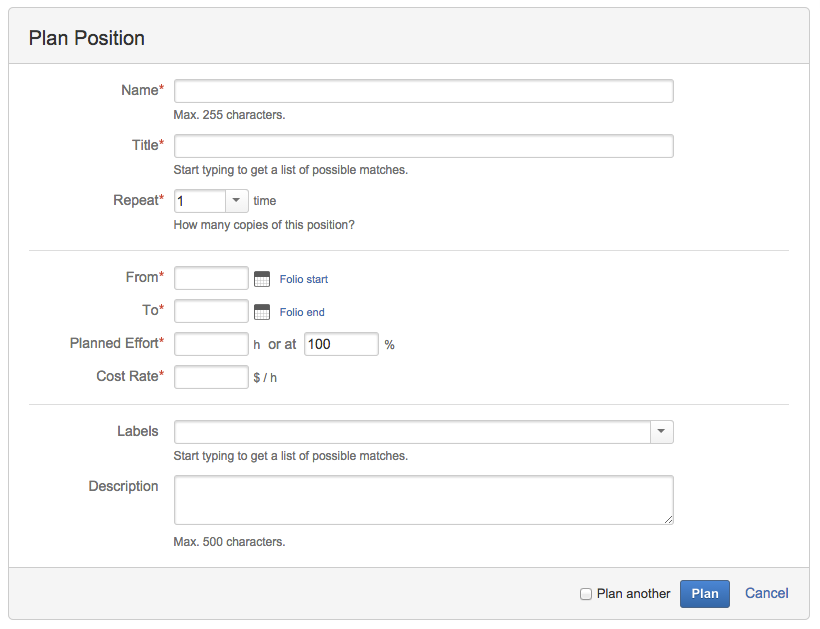
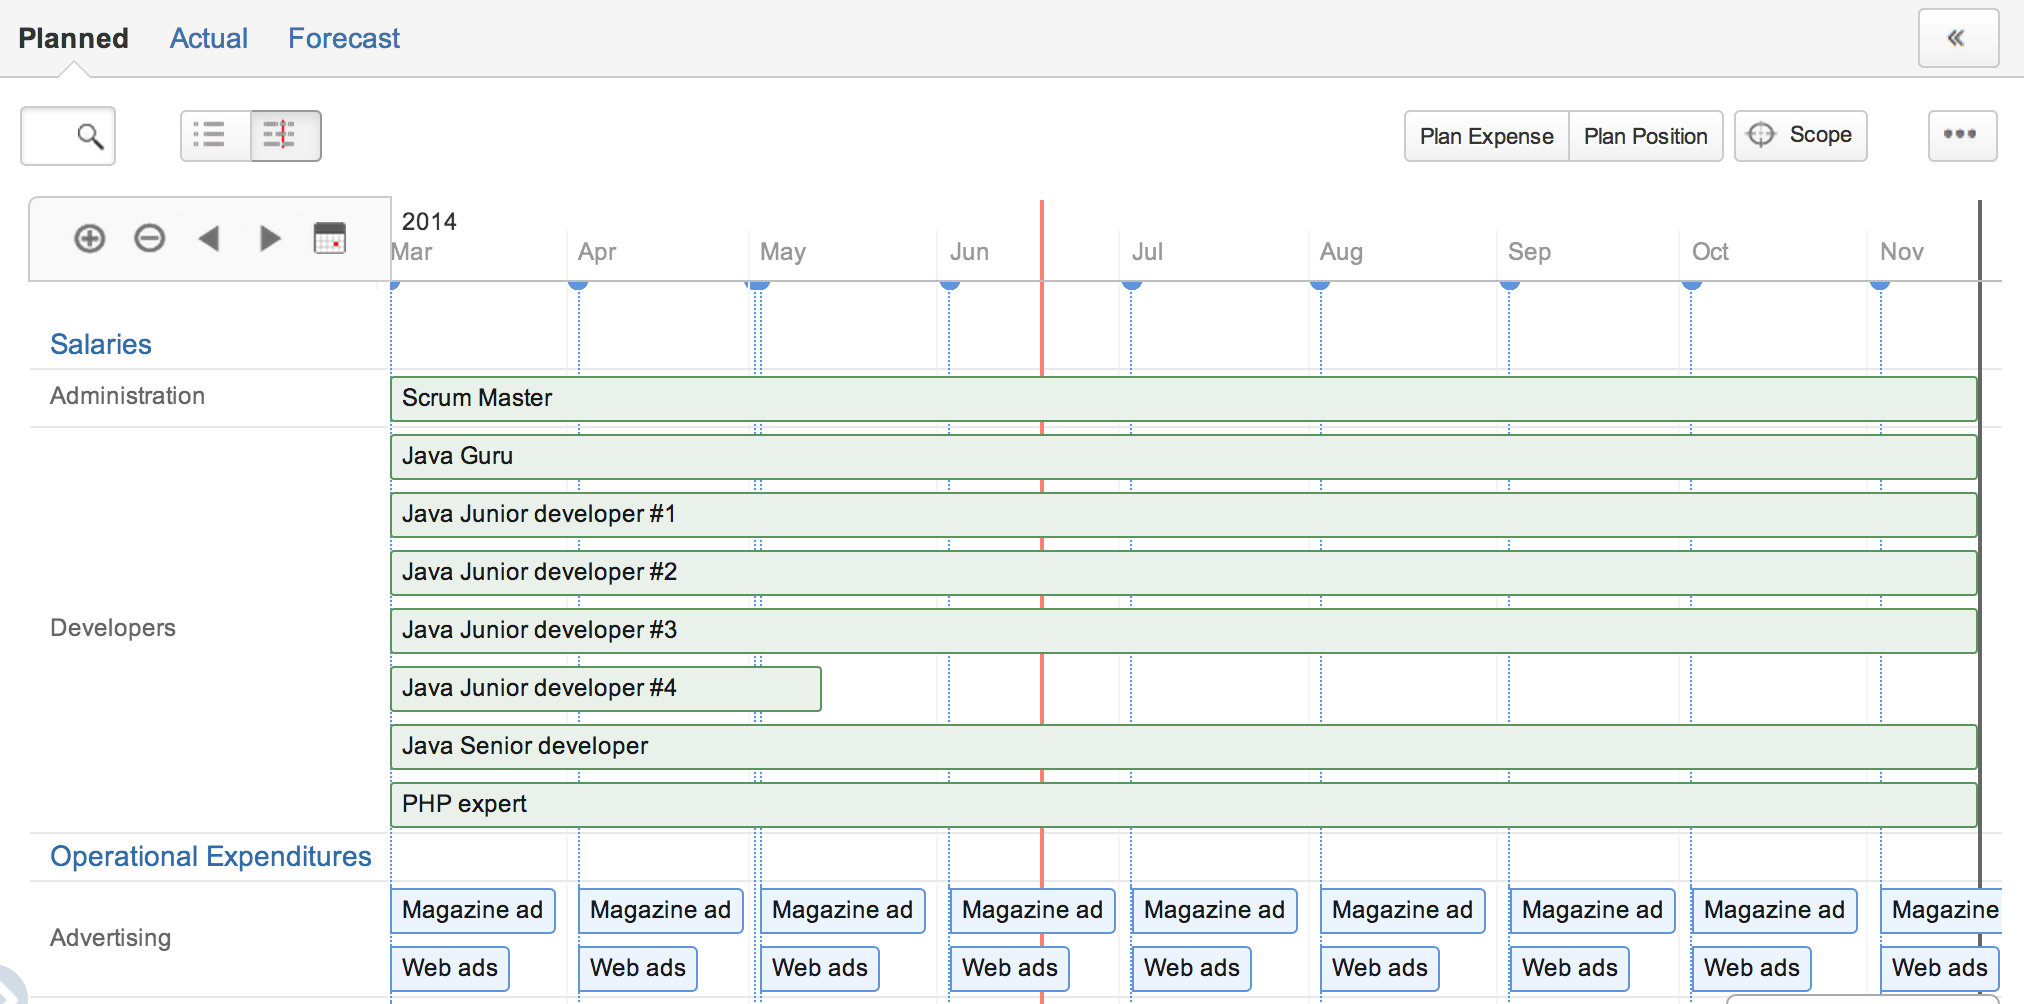
Copying an expense to actualSelect an existing expense to copy to actual by clicking on it and then either click on the drop-down menu on the top-right part of the expense details view (on righthand side of the screen) and select the Copy to actual option or hit the "t" (for to Actual) shortcut key. This will copy the selected expense to actual, including its attached files. You can copy multiple expenses to actual at once by selecting them in the budget (by pressing and holding the Control key while clicking the expenses to copy). You can then copy the selected expenses the same way you copy a single expense. The confirmation message will inform you of how many expenses have been copied. PositionsPositions are the salary expenses you plan the Folio will incur at one point or another. The planned costs page shows the calculated cost for each position and position groups (by title). The cost displayed on group title rows is simply the sum of the costs of the positions in that group. You can collapse (or expand) a group of positions by clicking the triangle icon ( See the Positions page for more information on positions and how their cost is calculated. Planning a positionTo plan a position, either click the Add Position button or hit the "o" (for position) shortcut key. This brings up a position edition dialog. Check the Plan another box at the bottom of the dialog in order to create many positions in sequence.
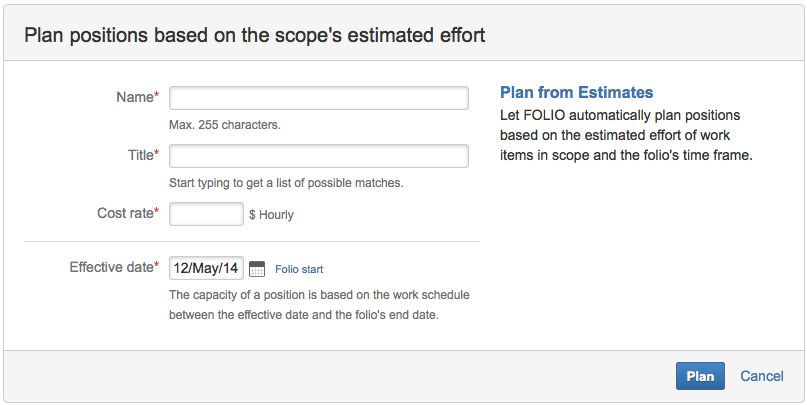
Planning positions from estimatesYou can ask FOLIO to automatically plan positions based on the estimated effort of issues in scope within the folio's time frame.
Editing a positionSelect an existing position to modify by clicking on it and then either click on the ... menu on the top-right part of the details panel (on righthand side of the screen) and select the Edit option or hit the e (for edit) shortcut key. This brings up the edition dialog. Refer to Adding a position section for a detailed description of the edition dialog. Deleting a positionSelect an existing position to delete by clicking on it and then either click on the ... menu on the top-right part of the details panel (on righthand side of the screen) and select the Delete option or hit the d (for delete) shortcut key. This brings up a dialog to confirm the deletion. Click the Delete button to confirm the deletion, or Cancel link to abort. Deletion is permanent, thus make sure you really want to delete a position before proceeding. You can delete multiple positions (and even a mix of expenses and positions) at once. Refer to the Multiple Selection to learn how to perform a batch deletion. Expenses and Positions TimelineThe Timeline View is displayed when the right part of the toggle button located at the top left of the Expenditure Browser is pressed Timeline charts in FOLIO offer various controls to navigate and focus on certain periods of time. Please refer to the Timelines page to learn more on available ways to interact with the Timeline.
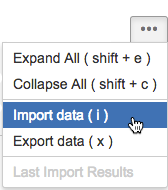
All operations described above can be executed directly from the timeline, including edition, deletion, search, multi-selection, etc. Hovering one of the timeline elements shows the date or time period corresponding to that element as well as its summary information, such as its name and planned cost. Import / ExportFOLIO Allows you to import or export your data in CSV (comma separated values) format.
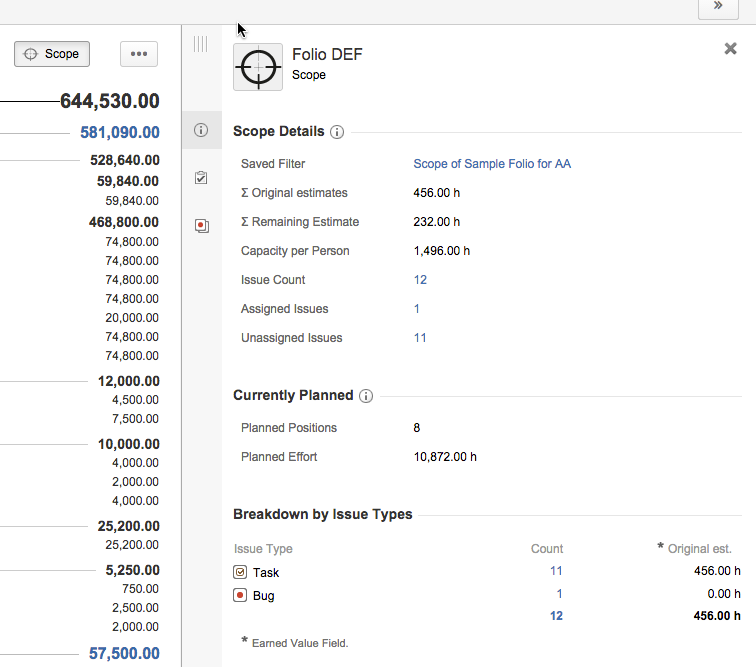
Importing Planned CostsTo import data from an existing CSV file, click on the ... button and select Import data. Alternatively, you can type the keyboard shortcut i to open the import dialog. See Importing Data from CSV and Planned Costs/Revenues Import to learn more about importing Planned Costs. Exporting Planned CostsTo export data to an external CSV file click on the ... button and select Export data. Alternatively, you can type the keyboard shortcut x to instantly export data. Exported CSV file includes both planned positions and expenses. See Planned Costs or Revenues CSV Export Detail to learn more about export data. Approving planned costsPlanned costs can be approved using a baselining mechanism. Refer to the Baselines page for more information on managing baselines. Scope InspectorThe scope inspector allows you to view the breakdown of the Folio's scope by issue type (user stories, bugs, etc.) and see if the planned positions have a capacity that matches the effort required for that scope. It will help you answer questions such as:
Clicking the Scope button brings up that information in the details panel on the right.
|
Video:
| ||||||||||||||||||||||||||||||||||||||||||||||||||||||||||||||||||||||||||||||||||||